Release 10.1.3.4
Part Number E12602-01
Contents
Previous
Next
| Oracle Business Intelligence Publisher Online Help Release 10.1.3.4 Part Number E12602-01 | Contents | Previous | Next |
The following steps are required to migrate the Oracle XML Publisher Enterprise Edition version 5.6.2 to the Oracle Business Intelligence Publisher version 10.1.3.2:
Back up the existing data in the database.
Back up the configuration file (xmlp-server-config.xml).
Install BI Publisher 10.1.3.2 following the installation instructions in the Oracle Business Intelligence Infrastructure Installation and Configuration Guide.
Migrate the server configuration properties.
Migrate the delivery configuration properties.
Set up the Scheduler database.
Run the migration script.
Migrate LDAP server settings.
Update User Interface (UI) translations.
Restart BI Publisher 10.1.3.2.
The following sections describe these steps in detail. Note that these upgrade steps from XML Publisher Enterprise 5.6.2 are for Oracle database deployments only.
Backup the existing data in the database.
Refer to the Oracle Database Administrator's Guide 10g for information and guidelines on backing up your data.
Back up the configuration file (xmlp-server-config.xml).
Backup the xmlp-server-config.xml under xmlpserver/WEB-INF in your XML Publisher 5.6.2 installation. Ensure to copy the xmlp-server-config.xml file to a location outside of the Web application area; otherwise the file will be removed when you install BI Publisher 10.1.3.2.
% cp ${ORACLE_HOME}/j2ee/home/applications/xmlpserver/xmlpserver/WEB-INF/xmlp-server-config.xml /tmpInstall BI Publisher 10.1.3.2.
You can remove XML Publisher Enterprise 5.6.2 and install BI Publisher 10.1.3.2, or you can install 10.1.3.2 in a separate location.
Important: In the installation process, specify the same repository location used in XMLP 5.6.2.
Refer to the Oracle Business Intelligence Infrastructure Installation and Configuration Guide for the installation steps.
Start up the server after the installation.
Migrate the server configuration properties.
BI Publisher 10.1.3.2 provides a user interface to enter server properties previously entered in the xmlp-server-config.xml file. Use the xmlp-server-config.xml file backed up in the previous step as a guide to enter the properties in the BI Publisher 10.1.3.2 user interface as follows:
Migrate general properties and properties from the <resource> section.
Select the Admin tab. Under System Maintenance, select Server Configuration.
Migrate properties from the <scheduler> section.
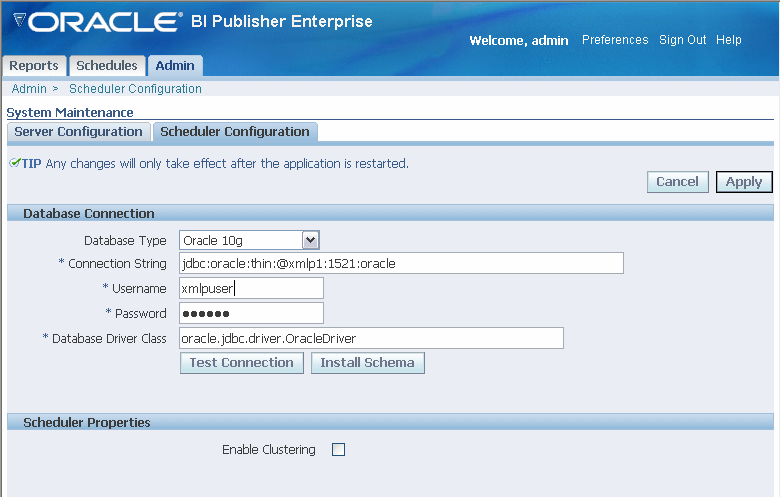
Select the Admin tab. Under System Maintenance, select Scheduler Configuration.
Migrate the delivery configuration properties.
Delivery configurations set under Configuration on the Admin tab in XML Publisher Enterprise 5.6.2 are now set on the Admin tab under Delivery Configuration in BI Publisher 10.1.3.2.
Note that in XMLP 5.6.2 you had to specify the following properties to enable the use of filters for printers and fax servers. In BI Publisher 10.1.3.2 you are no longer required to set these properties.
Temporary Directory - in 10.1.3.2 the system temporary directory is automatically used.
Buffering Mode - in 10.1.3.2 the buffering mode is always on.
Set up the scheduler database for BI Publisher 10.1.3.2
Perform the steps for setting up the BI Publisher Scheduler in the Oracle Business Intelligence Infrastructure Installation and Configuration Guide, omitting the create user step. Use the same user and database that you used for XMLP 5.6.2.
The database information you used in XMLP 5.6.2 is stored in the xmlp-server-config.xml file that you backed up in the previous step. Note that this process does not overwrite the existing data because the table names are different in 10.1.3.2.
[5.6.2 xmlp-server-config.xml sample]
     :
     :

<scheduler>
 <connection>
   <connectionType>jdbc</connectionType>
   <url>jdbc:oracle:thin:@xmlp1:1521:oracle</url>
   <username>xmlpuser</username>
   <password>xmlpuser</password>
   <driver>oracle.jdbc.driver.OracleDriver</driver>
 </connection>
</scheduler>
   :
:| Parameter in 5.6.2 Configuration File | Corresponding Field in 10.1.3.2 Scheduler Configuration Page | Value in the Sample Configuration File |
|---|---|---|
| url | Connection String | jdbc:oracle:thin:@xmlp1:1521:oracle |
| driver | Database Driver Class | oracle.jdbc.driver.OracleDriver |
| username | Username | xmlpuser |
| password | Password | xmlpuser |
The following figure shows a sample Scheduler Configuration page:

Run the migration script.
Log in to the database as the existing user and run the SQL script "migration_562to10132.sql". This script migrates all the data to the 10.1.3.2 tables.
To delete old data, you can run the SQL script "drop_562.sql".
% sqlplus xmlpuser/xmlpuser@oracle
 SQL*Plus: Release 10.1.0.3.0 - Production on Thu Jun 29 11:41:52 2006

 Copyright (c) 1982, 2004, Oracle.  All rights reserved.


 Connected to:
 Oracle Database 10g Enterprise Edition Release 10.1.0.2.0 - Production
 With the Partitioning, OLAP and Data Mining options

 SQL> @migrate_562to1013.sql

 SQL> @drop_562.sql
Migrate LDAP server settings.
If you have set up an LDAP server in 5.6.2, migrate the LDAP server configuration in 10.1.3.2 through the BI Publisher Admin interface.
Note: Open the 5.6.2 xmlp-server-config.xml and search for the LDAP server information. If the properties that start with "LDAP_" are commented out, you are not using an LDAP server and you can skip this step.
To migrate the LDAP settings:
Select the Admin tab.
Under Security Center, select Security Configuration.
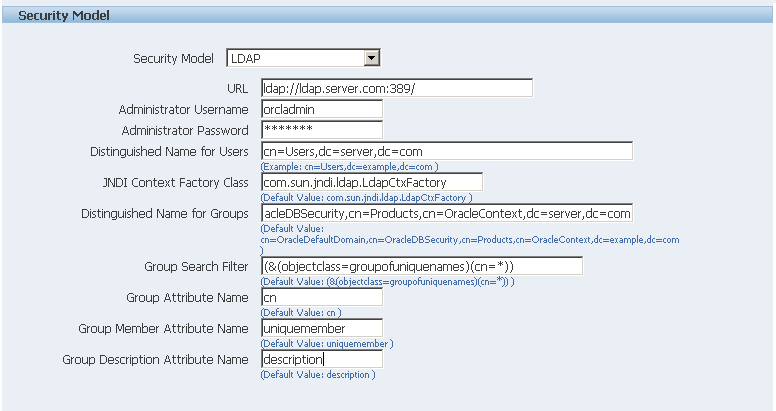
Under Security Model, choose LDAP from the list.
Enter the LDAP server information based on the 5.6.2 xmlp-server-config.xml. See the following sample configuration file, mappings table, and Admin page sample for more detail.
[5.6.2 xmlp-server-config.xml sample]
   :
   :
 <property name="LDAP_PROVIDER_URL" value="ldap://ldap.server.com:389/"/>
 <property name="LDAP_PROVIDER_ADMIN_USERNAME" value="orcladmin"/>
 <property name="LDAP_PROVIDER_ADMIN_PASSWORD" value="welcome"/>
 <property name="LDAP_PROVIDER_USER_DN" value="cn=Users,dc=server,dc=com"/>
 <property name="LDAP_PROVIDER_FACTORY" value="com.sun.jndi.ldap.LdapCtxFactory"/>
 <property name="LDAP_PROVIDER_GROUP_SEARCH" value="(&(objectclass=groupofuniquenames)(cn=*))"/>
 <property name="LDAP_PROVIDER_GROUP_SEARCH_ROOT"
  value="cn=OracleDefaultDomain,cn=OracleDBSecurity,cn=Products,cn=OracleContext,dc=server,dc=com"/>
 <property name="LDAP_PROVIDER_GROUP_ATTR_NAME" value="cn"/>
 <property name="LDAP_PROVIDER_GROUP_ATTR_MEMBER" value="uniquemember"/>
 <property name="LDAP_PROVIDER_GROUP_ATTR_DESCRIPTION" value="description"/>
   :
: | Parameter in the 5.6.2 Configuration File | Corresponding Field in the Admin Security Configuration Page | Value in the Sample Configuration File |
|---|---|---|
| LDAP_PROVIDER_URL | URL | ldap://ldap.server.com:389/ |
| LDAP_PROVIDER_ADMIN_USERNAME | Administrator Username | orcladmin |
| LDAP_PROVIDER_ADMIN_PASSWORD | Administrator Password | welcome |
| LDAP_PROVIDER_USER_DN | Distinguished Name for Users | cn=Users,dc=server,dc=com |
| LDAP_PROVIDER_FACTORY | JNDI Context Factory Class | com.sun.jndi.ldap.LdapCtxFactory |
| LDAP_PROVIDER_GROUP_SEARCH | Group Search Filter | (&(objectclass=groupofuniquenames)(cn=*)) |
| LDAP_PROVIDER_GROUP_SEARCH_ROOT | Distinguished Name for Groups | cn=OracleDefaultDomain,cn=OracleDBSecurity,cn=Products,cn=OracleContext,dc=server,dc=com |
| LDAP_PROVIDER_GROUP_ATTR_NAME | Group Attribute Name | cn |
| LDAP_PROVIDER_GROUP_ATTR_MEMBER | Group Member Attribute Name | uniquemember |
| LDAP_PROVIDER_GROUP_ATTR_DESCRIPTION | Group Description Attribute Name | description |

Update User Interface (UI) translations.
To update the UI translation files, copy all the .xlf files under Admin/Translation in the 10.1.3.2 repository template to your existing repository.
Assume you have the following:
* 10.1.3.2 repository template location : /new10132repository
* Your existing 5.6.2 repository : /my562repository
then execute:
% cp /new10132repository/Admin/Translation/*xlf /my562repository/Admin/TranslationRestart BI Publisher 10.1.3.2
Restart the 10.1.3.2 server to make your changes effective.
![]()
Copyright © 2005, 2008, Oracle and/or its affiliates. All rights reserved.